
Top 5 Mistakes Beginners Make with Stained Glass | Caveman Glassworks
- Paul Urteaga
- Jul 21, 2025
- 3 min read
Updated: Aug 7, 2025
Starting your journey into stained glass art can be exciting—but also overwhelming. To help you get off to a strong start, it’s important to avoid some of the most common mistakes beginners make with stained glass. Whether you're exploring stained glass for beginners or picking up tools for your first project, avoiding these five pitfalls can save you time, money, and frustration.

1. Starting with Overly Complex Designs
It’s tempting to jump straight into those stunning, intricate stained glass patterns you see online. But for beginners, tackling complex projects too soon often leads to broken glass, wasted materials, and discouragement.
Instead, start simple. Choose stained glass patterns with straight lines and no more than 5 to 10 pieces. Designs with larger sections and fewer curves are ideal for building your skills. As you gain confidence, you can gradually take on more challenging pieces.
2. Poor Cutting Techniques
Learning how to cut stained glass properly is essential. Many beginners struggle with cutting because they haven’t practiced the right technique. This leads to jagged breaks, material waste, and even injury.
Before you begin your project, practice on scrap glass. Hold your glass cutter at a consistent 90-degree angle, apply even pressure, and make a single, smooth score line. Don’t go over the same line twice. When you can break glass cleanly and predictably, you’ll know you’re ready.
🔗 Check out our full guide: Tips on How to Break Stained Glass
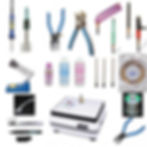
3. Using Low-Quality Tools and Materials
Trying to save money on tools often costs more in the long run. Low-quality glass cutters, pliers, or solder can make stained glass crafting more difficult and less enjoyable.
Instead, invest in reliable stained glass tools from the start. We recommend:
Glass cutter that feels comfortable in your hand
Running pliers and grozing pliers for precision
Hakko FX-601 or Weller 100-watt soldering iron
Stained glass-specific copper foil and flux
High-quality solder
Avoid using old window glass or supplies meant for other types of work—always use materials designed for stained glass art.
🔗 Learn more: Tools for Stained Glass Crafting: A Beginner's Guide
4. Rushing the Foiling and Soldering Process
One of the biggest beginner mistakes in stained glass is rushing through copper foiling and soldering. This step demands patience and precision.
Take your time to:
Apply foil evenly and center it on the glass edges
Burnish the foil thoroughly for strong adhesion
Use the right amount of flux and maintain a steady soldering temperature
Move your soldering iron at a smooth, consistent pace for clean, rounded bead lines
Remember: the quality of your preparation shows in the final result.
5. Ignoring Safety Precautions

Safety is crucial when working with sharp glass, lead, and chemicals. Skipping proper gear can lead to injuries or long-term health risks.
Always use:
Safety glasses when cutting glass
Protective gloves when handling sharp edges
Good ventilation or a fume extractor when soldering
A respirator, if you're regularly working with lead
Hand washing and first aid supplies on hand at all times
🔗 Learn more about staying safe: Stained Glass Safety Gear
Final Thoughts
By avoiding these common mistakes, you’ll set yourself up for a more rewarding experience in stained glass art. Every expert stained glass artist once started as a beginner—patience and practice are your best tools.
Thanks for visiting Caveman Glassworks! We hope you found this guide helpful. Be sure to check out more of our blog posts and grab some free stained glass patterns to keep creating!
🔗 Explore more: Caveman’s Full Blog Library