
Stained Glass Tools: A Beginner's Guide to Creating Your Own Colorful Masterpieces
- Paul Urteaga

- Sep 13, 2023
- 10 min read
Updated: Aug 3, 2025
Creating stained glass art may seem difficult and time-consuming, but it all depends on how you approach it. Starting with simple designs and gradually building up your skills and tools can make the process more manageable. With patience and practice, anyone can learn to create beautiful stained glass pieces. Do not let the myths hold you back from exploring this fascinating art form.
Building upon the previous articles, Tools for Stained Glass Crafting, and the subsequent Stained Glass Patterns for Beginners, this article offers further guidance for those new to the craft.

The previous articles provide an introduction to the necessary tools and techniques, while this article delves into the specific tools needed to create your first masterpiece. Overall, these resources offer a helpful starting point for anyone interested in exploring the world of stained glass crafting.
Picking up from where we left off in Stained Glass Patterns for Beginners, creating stained glass art is a process that involves various tools, each serving a unique purpose. Some essential tools for beginners include a scoring tool (glass cutter), running pliers, grozing pliers, glass grinder, copper foil & fid, soldering iron, flux, and a flux brush. It is crucial to use the right tools to make clean and precise cuts, grinding the edges of each piece to fit together perfectly. Soldering the pieces together with lead lines creates stability and strength in the finished product. With some patience, practice, and the right tools, creating beautiful stained glass art can be a rewarding and fulfilling hobby.
The Art of Scoring and Breaking:
Scoring Tool and Glass Cutter & Oil
Let’s break some glass! EYE PROTECTION! When working with glass, it is important to wear eye protection. Breaking glass can create tiny and microscopic pieces that can fly across the room and potentially harm your eyes. So, before you begin any glass-related project, make sure to invest in some protective eyewear to keep your eyes safe.
Ok, here we go. The scoring tool, often a carbide wheel, is used to make a scratch or 'score' on the glass surface, which acts as a guide for the running pliers.
There are various types of glass cutters, but the most common one for beginners is the pencil grip cutter. It is comfortable to hold and easy to control, perfect for those starting out. Another type is the pistol grip. Most scoring tools today come with an oil reservoir which is filled with a small amount of oil. To achieve a smooth score line on glass, it is essential to use cutting oil. This lubricant ensures that the scoring tool's wheel glides smoothly along the surface of the glass, preventing it from skipping or dragging. The oil also helps to dissipate the heat generated by the friction of the scoring tool on the glass, reducing the risk of cracking or breaking the glass. Using cutting oil is a simple yet effective way of achieving a clean, precise score line when working with glass.
To cut glass with a scoring tool, begin by scoring a straight line on the surface of the glass. Apply even pressure throughout the cut, taking care not to press too hard, which can break the glass. You should hear a scratching sound and see a visible scratch along the line. It may take a few attempts to get the hang of it, but practice will improve your technique.
Shaping Pattern Pieces: Video, Running and Grozier Pliers
Video: Using Tools
In this timelapse video, the glass scoring, breaking, and nipping process is slowed down to give a detailed view of the tools used in this section. The poor videography may affect the viewing experience, but the video captures the precision and skill required to work with glass. The tools delicately score the surface of the glass before breaking it into pieces and nipping the edges for a smooth finish. This process requires patience and accuracy to achieve the desired outcome.
Running Pliers
Running pliers are a tool used for breaking glass along a scored line. They should be positioned at the end of the glass and aligned with the score line. By applying gentle force to the pliers, the glass will break into two separate pieces. This tool is commonly used in glass cutting and requires a steady hand and precision to achieve a clean break.
Grozier Pliers
After cutting your glass, you might find some irregular edges or small pieces that need to be removed. This is where Grozier pliers come in handy. They have a flat and curved jaw that helps break the glass along the score line and nibble away excess glass.
Using Grozier pliers is straightforward: simply place the flat jaw on the glass surface, align the curved jaw with the score line, and apply a gentle pressure. The glass should break along the score line. If there are any tiny shards left, use the curved jaw to nibble them away.
Reminder: Always remember to wear safety glasses when using Grozier pliers. Tiny glass shards can fly off and cause injury. Safety should always be your top priority when working with glass.
Pattern Placement
In the previous article about Stained Glass Patterns for Beginners, Section 3: Creating Pattern Pieces, it was mentioned that two copies of the pattern would be needed, and this is where it becomes important. To create the pattern mentioned in the article, use a surface such as a bulletin/cork board, sheetrock, or Homasote. The pattern measures 8” x 13” so make sure your surface is big enough. Create a border for your pattern using wooden paint sticks, trimmed yard stick, or 1/2” x 1/16” aluminum angle with predrilled holes for your push pins. When we begin the next section on grinding, you will use this pattern to fit your pieces together. Oh, the second copy of your pattern! Yes, the second copy of a pattern is kept as a master copy for future duplicate projects. This saves time since the pattern does not have to be created from scratch each time. By doing this, a library of patterns can be created for future use.

Glass Grinder
Now that your glass pieces are cut and the excess glass removed, it's time to smooth and shape them. This is where the glass grinder comes in. It is a machine with a diamond coated grinding bit that spins at high speed, helping you smooth the edges and shape your glass pieces to fit your design perfectly.
To use a glass grinder, place the edge of the glass against the rotating grinder bit while ensuring water is used to prevent glass dust and overheating. It's a simple process to produce finely shaped glass pieces. After shaping your piece according to the sticky backed paper, remove the paper and carefully place it onto your pattern as per the label. This will be similar to piecing together a puzzle, but with the added benefit of having the perfect fit.
One important tip when using the glass grinder: always grind the glass edges at a 90-degree angle. This creates a flat edge that fits together nicely with other glass pieces, making the soldering process easier. Glass grinders come in various brands, shapes, and sizes to suit different needs and preferences. Popular brands include Inland Craft, Gryphon, and Glastar. The shape of the grinder can range from a compact, small-sized grinder to a larger, more powerful table grinder. Some grinders may also come with multiple heads and accessories, allowing for different grinding options and finishes. Ultimately, the choice of brand and style of glass grinder comes down to personal preference and the intended use of the grinder.

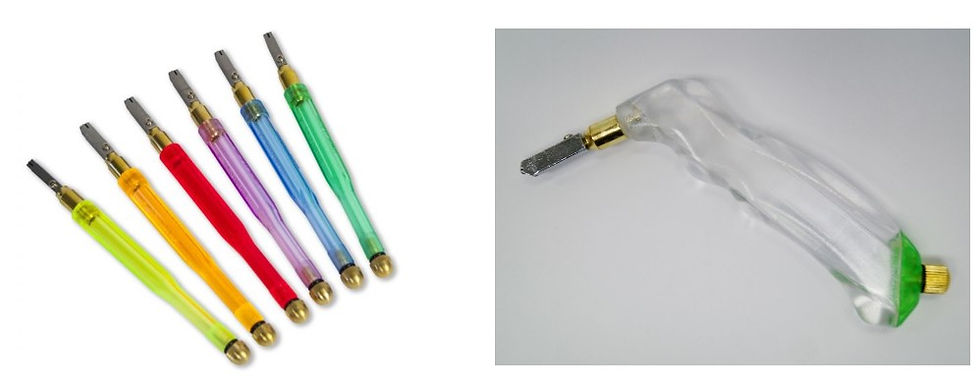
Copper Foil, Fid, and Scissors
Copper Foil
Copper foil is a necessary material used in the construction of stained glass pieces. The main purpose of copper foil is to provide a smooth edge around the glass pieces and to hold the glass securely in place. During the process of constructing a stained glass piece, the glass is cut to fit a specific design. The copper foil is then wrapped around the edge of each piece of glass, and the pieces are soldered together to create the final product. Below is a rather fast paced video showing this method. Although I am using a handheld copper foil tool in the video below, it is not necessary to use a handheld copper foil tool. While such a tool can be helpful, there are many other tools and methods that can be used to achieve similar results. It is important to start with the basics and work your way up as you gain experience and skill.
Once the copper foil is applied to the stained glass piece, the edges of the foil should be pressed to the sides of the glass. This can be done using a rolling tool, which is optional, and a fid to burnish the edges. Burnishing involves running the fid along the edges of the foil, making sure it is securely attached to the glass. This step is important for ensuring a strong and durable copper foil line. After applying foil to all pieces, they should fit together with a slight bit of movement. This allows melted solder to join them together successfully.
Flux, Soldering Iron, and 60/40 Solder
Flux
Stained glass flux is a chemical compound that is applied to the surface of your copper foiled glass pieces before they are soldered together. The flux helps bond the pieces of glass together by promoting the flow and adhesion of the solder. The soldering iron heats up the solder and allows it to flow between the joints of the glass pieces, securing them together. It is essential to have a steady hand and take caution while using the soldering iron to avoid any injuries or damage to the glass pieces.
Start by selecting a small section of your glass piece, and using your flux brush, apply flux to the copper foil seams. Be sure to apply enough flux to cover the seams completely without leaving any gaps. A little flux goes a long way, so don’t overdo it.

Soldering Iron
The purpose of using a soldering iron in stained glass making is to melt and join pieces of copper foil together to create a strong and permanent bond. Soldering is essential when assembling a stained glass. It allows the artist to create intricate designs and shapes by carefully melting the solder onto the copper foil. The soldered seams create a waterproof seal that strengthens the entire piece. Soldering irons come in various sizes and temperatures and are an essential tool in the stained glass artist's toolkit.
When it comes to soldering irons, it is important to invest in a quality one. While there are many options on the market, it is recommended to do research and avoid purchasing a cheap one from an auto parts store, as it may not work effectively. Look for a brand that is reliable and has good reviews from customers. It is also important to consider the wattage and temperature range, depending on the type of soldering work you will be doing. For beginners, I recommend two preferred brands of soldering irons with temperature control are Weller and Hakko. Weller's WP100 soldering iron has a temperature range of 350°F to 850°F and a quick heat-up time, while Hakko's FX888D model has a temperature range of 120°F to 899°F and various interchangeable tips to suit your soldering needs. Both brands have a good reputation for durability, precision, and ease of use, making them great choices for beginners and professionals alike. Having personally used and continuing to use the Hakko and Weller soldering irons, I highly recommend both brands. The Hakko soldering iron has a sleek and ergonomic design that makes it comfortable to use and it heats up quickly. The Weller soldering iron has a more traditional design but its heating element is very durable and can withstand a lot of use. Both brands offer a range of models with different features and wattage options, making them suitable for a variety of soldering projects. Overall, I have had positive experiences with both Hakko and Weller soldering irons.
CAUTION: It is important to remember that touching a hot soldering iron will cause an instant burn. Soldering irons can reach temperatures of up to 800 degrees Fahrenheit, causing serious injury if proper precautions are not taken. Always wear protective gloves and keep a first aid kit readily available in case of accidents. It is also important to ensure the soldering iron is switched off and unplugged when not in use to prevent accidental burns or fires. Remember to handle soldering irons with caution and always prioritize safety.

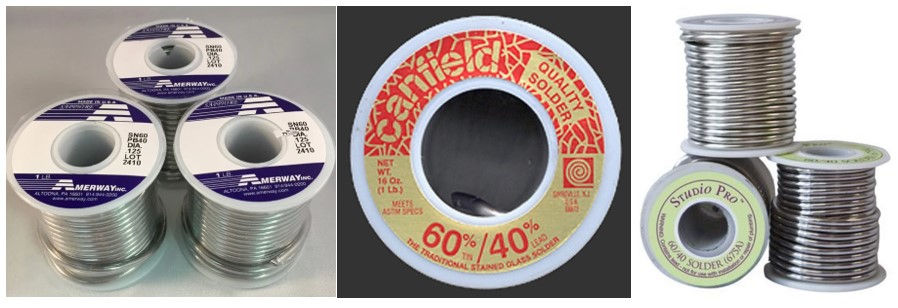
60/40 Solder
Now… Let’s talk solder! The solder is the metal alloy that you’ll melt with your soldering iron to join your glass pieces together. The most commonly used solder in stained glass art is 60/40 solder, which is made up of 60% tin and 40% lead. It’s easy to work with, melts at a lower temperature, and gives a smooth and shiny finish.
When using the solder, hold it in one hand and the soldering iron in the other. Then, touch the tip of the soldering iron to the solder to melt it. The molten solder should flow smoothly into the joints between your glass pieces.
Remember, lead is toxic, so always wash your hands after handling 60/40 solder and avoid inhaling the fumes when soldering. Safety should always be your top priority when working with stained glass.
Now, let’s solder and join our pieces. To join your stained glass pieces, ensure that your pieces are fluxed and then heat up your copper foil with a soldering iron. Touch the iron with solder, which will melt immediately. Gently slide the iron across the joints to fuse the pieces together. Complete your section, flux your next section, and continue until you are finished.
Next, remove your push pins, turn your piece over and repeat the flux and solder process.
Cleanup
Cleaning Glass
Cleaning the flux from your stained glass is an important step in the final stages of creating a stained glass piece. After soldering, the flux residue can darken the solder lines and detract from the overall appearance. To remove the flux, first let the piece cool completely, then fill a container with warm water and a few drops of Dawn dish soap. Gently scrub the solder lines with a soft-bristled brush (old toothbrush), making sure to rinse the sponge frequently. Once the flux is removed, dry the piece completely. Do not reuse the brush and sponge for anything else other than cleaning your glass.
I will be creating another article in regards to placing a zinc frame around your finished glass piece. This frame will include hanging hooks so that you may hang and display your finished masterpiece.
Conclusion
Creating stained glass art might seem challenging, but with these tools and a little practice, you’ll be creating your own colorful masterpieces in no time. Remember, the most crucial part of this process is to have fun. After all, it's not just about the end product; it's about the journey of creating something beautiful with your own hands. So, grab your tools, roll up your sleeves, and let's create some stunning stained glass art together!
We're gratful for your visit and hope you'll take some time to check out more of our articles. Until next time - Press on Friends!!!
Looking for more information and topics? Visit Caveman's List of Blog Articles for more topics anf free stained glass patterns.


Comments